


How to Choose the Right Computer Cooling Fan
In this guide, we’ll cover the essentials—fit and sizing, airflow vs. static pressure, key specs, control options, bearing types, and how to balance noise with performance—so you can choose the right computer cooling fan setup without guessing.
Why You Need a Computer Cooling Fan
A computer cooling fan does more than simply “lower temperatures.” It has a direct impact on day-to-day performance, stability under load, and the long-term health of your hardware. CPUs and GPUs can generate heat very quickly, and if that heat isn’t removed efficiently, the system will protect itself by reducing clock speeds. That’s when you’ll notice frame rates drop, renders slow down, or heavy workloads feel less responsive. Push it far enough, and overheating can trigger crashes, sudden shutdowns, or gradual component wear over time.

A good computer cooling fan setup also helps the entire case breathe. With balanced intake and exhaust, hot air is less likely to linger around the CPU cooler, GPU, VRMs, and SSDs. And when airflow is working with you, fans don’t need to spin at high RPM all the time—so you can maintain solid temperatures while keeping noise under control.
Step 1 — Laptop Cooling Fan Compatibility & Size
Before buying any laptop cooling fan, make sure it will physically fit your case (or the device you’re cooling). In most PC builds, common fan sizes are 80 / 120 / 140 mm, and some larger cases also support 200 mm.
Start with the basics: measure the mounting holes. Use a tape measure and check the distance hole-to-hole across the mounting points (avoid measuring diagonally). Then check your case manual to confirm which sizes each position supports—and whether that spot is designed for a radiator or a standard case mount.
A simple rule of thumb: if your case allows it, larger fans (like 140 mm) can often deliver similar cooling at lower RPM, which usually means less noise.

Once you know the size and mounting style, choosing gets much easier. Beyond typical 120/140 mm case fans, some builds—or compact devices—benefit from a blower-style fan when space is tight or airflow has to push through a more restrictive path.
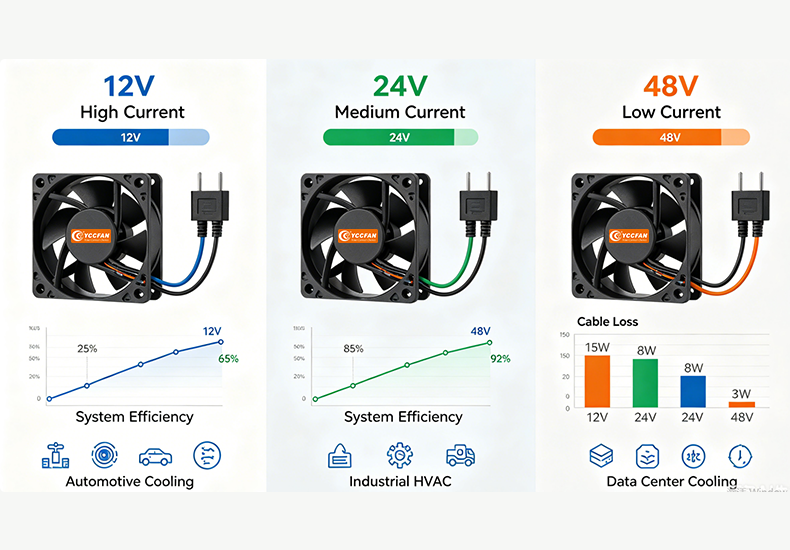
For example, the YCCFAN DC Blower Fan comes in a compact 75×75×30 mm size and supports 5V / 12V / 24V, making it easy to match different power setups. It can also be configured with features like PWM speed control, FG (tach) feedback, RD (alarm) output, and motor protection, so you can monitor fan status and manage cooling more precisely. The housing and impeller use glass-fiber reinforced PBT (UL94V-0), which adds durability for long-term, enclosed-system use.
Step 2 — Pick the Right Cooling Fan for Laptop Type: Airflow vs. Static Pressure
Choosing the right cooling fan for laptop comes down to one simple check: is the fan working in open air, or is it trying to push through something that adds resistance?
Airflow fans (CFM-focused)
Airflow fans are best when the case “breathes” easily. If the intake and exhaust paths are relatively open, these fans move a lot of air with less effort—making them a great fit for rear/top exhaust and many open intake mounts. They’re the go-to option when you mainly want to keep fresh air moving through the chassis and clear out warm air efficiently.

Static pressure fans (mmH₂O-focused)
Static pressure fans are designed for tougher airflow paths. They hold up better when air has to squeeze through radiators, dense heatsinks, dust filters, tight mesh, or a front panel with small vents. In these situations, pressure is what keeps airflow from dropping off—so cooling stays more consistent even when the case is more “closed” or restrictive.
Balanced / hybrid fans
Balanced (hybrid) fans sit between the two. They won’t be the absolute best in every spot, but they’re a safe, flexible choice across mixed builds—for example, cases with moderate mesh, light filters, or a combination of intake and exhaust mounts. If you prefer to keep things simple (fewer fan models, less tuning), hybrids usually deliver solid results without much fuss.
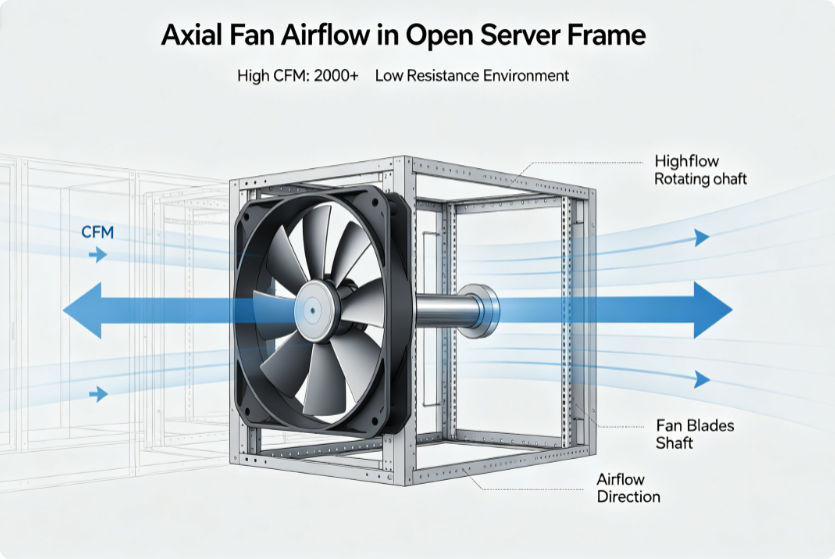
Step 3 — Understand the Cooling Fan Key Specs
CFM (Airflow)
CFM is the “how much air” number—most useful when your cooling fan is working in a fairly open path, like a mesh front panel or an unobstructed exhaust. The catch is that CFM is usually measured in ideal conditions, so real-world airflow drops once you add filters, tighter front panels, radiators, or cable clutter. A practical way to use CFM is to compare fans only within the same size and then treat it as a directional indicator: higher CFM can help, but only if the case can actually breathe. It also helps when a brand’s spec sheet lists airflow alongside speed and other basics in one place—YCCFAN product listings often present the core parameters together, which makes quick side-by-side comparison easier.
Static Pressure (mmH₂O)
Static pressure is the “can it push through stuff?” number. If the fan is pulling through a dust filter, pushing through a radiator, sitting behind tight mesh, or mounted to a dense heatsink, static pressure becomes more predictive than CFM. In these restrictive spots, a high-airflow/low-pressure fan can look great on paper but fall off hard in actual performance. A useful mental shortcut: if you can feel noticeable resistance when you blow through the surface (filter/rad/mesh), prioritize higher mmH₂O. Also, pressure matters not just for raw cooling, but for keeping temps stable—especially when the system ramps up under load.

RPM (Speed)
RPM is fan speed, and it’s closely tied to both cooling and noise. Higher RPM typically increases airflow and pressure, but it can also introduce more turbulence and motor noise. For most builds, you don’t want a fan that only performs when it’s screaming at max RPM—you want one that’s effective in the mid-range. That’s why it’s worth checking the fan’s rated RPM range (or PWM range) and aiming for a setup where the fan can cruise quietly at idle/light use, then ramp smoothly during gaming or rendering.
Noise dB(A)
dB(A) gives a rough sense of loudness, but it’s not perfectly comparable across brands because test methods vary. Use it as a reference, then think about how the fan will sound at the speeds you’ll actually run. Also pay attention to the “tone” of the noise—motor hum, clicking, or vibration can matter just as much as the number.
Practical tip (compare fairly)
Compare fans in the same size (120 vs 120, 140 vs 140) and at similar RPM ranges. If possible, compare within the same product family too—like a 120 mm and 140 mm from one lineup—since blade design and motor tuning tend to stay consistent. That’s also why sticking to a single range (including options from YCCFAN) can make airflow behavior more predictable when you’re standardizing fans across a build.
Step 4 — Computer Cooling Fan Connectivity & Control Features
4-pin PWM vs. 3-pin
If your motherboard supports it, a 4-pin PWM computer cooling fan is usually the easier option to live with. PWM control allows the fan to run very slowly when the system is cool—so idle noise stays low—and then ramp up smoothly as CPU/GPU temperatures increase. A 3-pin fan can still be controlled, but it depends on voltage regulation from the motherboard. On some boards, that means limited speed range or occasional issues starting at very low RPM.
Motherboard headers & hubs
Before ordering fans, count how many fan headers you actually have and where they sit on the motherboard. If you’re adding multiple case fans, a PWM hub helps keep wiring cleaner and lets a group of fans follow the same control curve. A powered hub is especially useful when you’re running several fans, because it takes the power load off a single header while still using the PWM signal for synchronized speed control.

Monitoring (Tach feedback)
Tach feedback reports fan speed back to the system, which is helpful for stable fan curves and basic health checks. If a computer cooling fan slows down, stalls, or behaves inconsistently, tach monitoring makes it easier to catch the issue early—before temperatures start creeping up.
Step 5 — Bearing Type & Build Quality (Quiet + Longevity)
Hydraulic bearings (recommended baseline)
For most users, a hydraulic bearing cooling fan is the “safe choice.” It typically spins smoothly, stays quieter as it ages, and handles long daily runtime better than basic bearing designs—especially if your PC often runs for hours at a time.
Sleeve bearings (budget-friendly, with trade-offs)
Sleeve bearings can be perfectly fine for light use and are usually cheaper, but they’re more sensitive to heat and mounting orientation. In warmer cases—or after long-term use—it’s more common for sleeve-bearing fans to get louder, develop vibration, or lose consistency.

Real-world impact
Bearings don’t just affect lifespan; they shape the sound you hear every day. A fan can be quiet when new, then slowly pick up hum, ticking, or rattle as the bearing wears. If you’re building a quieter system, bearing quality is one of the parts of a computer cooling fan that you’ll actually notice over time.
Step 6 — Noise vs. Performance vs. Budget
Quiet build
If low noise is your goal, start with larger fans where your case allows (often 140 mm). Pair that with PWM control and better bearings, then use a gentle fan curve so each computer cooling fan stays at low RPM during everyday tasks. Let the fans ramp only when temperatures truly rise—like during gaming, rendering, or long exports—so the PC feels quiet most of the day.
Performance build
If cooling headroom matters most, design around the airflow path. Use static pressure fans anywhere air has to fight resistance (radiators, dense heatsinks, filters, tight mesh), and make sure intake airflow is strong enough to feed both the CPU cooler and the GPU. In performance-focused builds, consistency is key: stable temps under sustained load are usually worth more than shaving a few extra dB.
Budget build
On a tight budget, keep it simple and get the basics right: choose the correct fan type for each position (airflow for open mounts, pressure for restrictive mounts) and go with PWM if it’s available. A well-matched computer cooling fan setup with reasonable control often beats chasing high headline specs that don’t translate to your specific case layout.
Read more:
https://www.yccfan.com/articledetail/what-are-the-different-types-of-cooling-fans.html
https://www.yccfan.com/articledetail/can-i-replace-my-laptop-cooling-fan-myself.html
Conclusion
A good computer cooling fan setup comes from matching the fan to the job. Start with compatibility and size, then choose airflow or static pressure based on how restrictive the mounting location is. Use specs like CFM, mmH₂O, RPM, and noise as comparison tools (especially within the same size class), and don’t overlook control features like PWM and tach feedback.